Build A Connect Four Library In TypeScript - Part 1
In this series, we will go over how to create a reusable TypeScript class that can be used to build the game Connect Four, and in a future series we will see how we can use this library to create implementations of the Connect Four game for the CLI and the web.
In part 1 of this series, we are going to review the rules and game play of the game Connect Four and we will start to build out the initial ConnectFour class by adding the properties and methods that will be needed.
In order to follow along with this series, you will need the following:
- Access to a development environment that has Node.js 16 installed.
- A code editor of your choice: Sublime, VSCode, Notepad, etc.
- Some familiarity with JavaScript. We will not be going over the basics of JavaScript in this series, but you should be able to still follow along.
We will not be going over the basics of TypeScript, however you should be able to follow along if you are not familiar with TypeScript.
Series Links
You can find links to all of the posts in this series here:
Series Code
You can find the code for the basic project setup here on GitHub: Project Start
You can find the completed source code for this article here on GitHub: Blog Post 1 Code
Lastly, if you would just like to use a NPM package for this library, you can find that here: NPM - @devshareacademy/connect-four .
Connect Four
Before we start writing any code, we will do a quick review of the game Connect Four. Connect Four is a two player board game, where players take turns dropping different colored tokens into a 7 X 6 grid. The objective of the game is to be the first player to get your four tokens in a horizontal, vertical, or diagonal line.
To play the game, you drop one of your tokens into one of the columns at the top of the vertical grid, which will result in the token falling into the next open space in that column. Finally if the game board fills up, and no player managed to connect four tokens of their color, the game ends in a draw.

Getting Started
We will be using the following Connect Four Project Skeleton as a starting point for our library that we will be building. This project skeleton has the initial project structure for building a TypeScript NPM module and has the following support:
Note: You can also find the code for this project skeleton in a separate branch on GitHub here: Project Skeleton .
Once you download the project skeleton, you will need to install the required development dependencies for the code base. This can be done by running one of the following commands:
# NPM Package Manager
npm install

# Yarn Package Manager (Only if you are using Yarn)
yarn install --frozen-lockfile
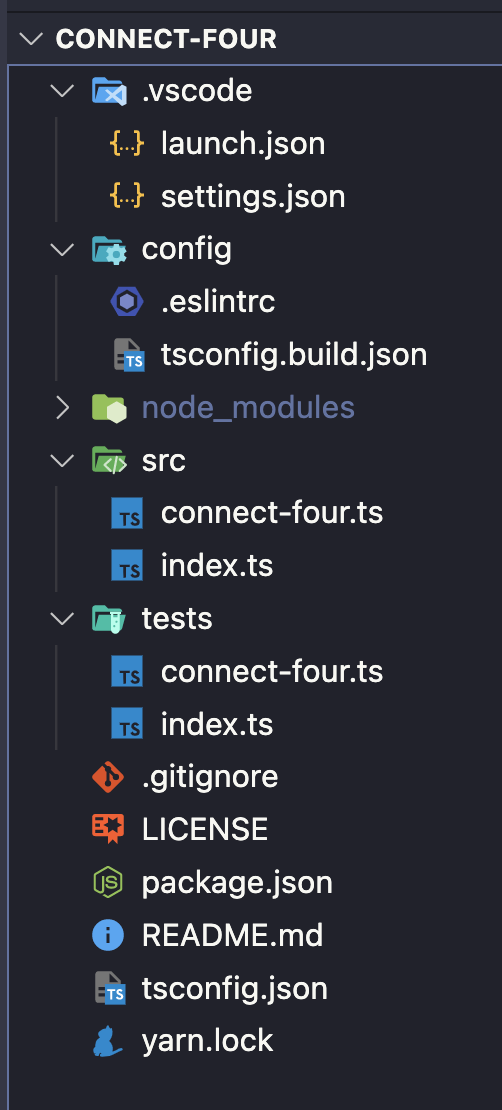
Once the project dependencies are installed, you should see a project structure like this:
Finally, to make sure everything is working properly, if you run one of the following commands:
# NPM Package Manager
npm run build

# Yarn Package Manager
yarn build
The project should compile and you should see a new folder called dist, which will have all of the compiled source code.

Project Structure
In the project folder, there is a variety of files and folders. At a high level, here is a quick summary of what each folder and file is used for:
- .vscode - this folder contains configuration files for the VSCode editor, which will add auto linting and custom launch configurations for running tests (if you are not using VSCode, you can remove this folder from your project)
- config - this folder contains configuration files for ESLint and TSC (the TypeScript Compiler)
- dist - a dynamically generated folder which will contain the compiled source code of the finished library (generated when you run the build script)
- node_modules - a dynamically generated folder which contains the project developer dependencies when working on the library (generated when you run the install script)
- src - this folder will contain the core code for our library (currently contains a placeholder Class for the Connect Four library)
- tests - this folder will contain the custom tests for our library
- .gitignore - this file is used for telling git to ignore certain files in our project (mainly used for our project dependencies and dynamically generated files)
- package.json - a configuration file for npm that contains metadata about your project
- tsconfig.json - a configuration file for TSC
- yarn.lock - a configuration file that contains the exact tree structure of the project dependencies and their versions (helps with repeatable project builds)
For the most part, we will only be focusing on the files in the src and tests folders, which is where we will be writing our code. The other files are primarily configuration files to support using TypeScript, ESLint, and Node.js.
Planning Our ConnectFour.ts Class
In the project src folder we have two files: index.ts and connect-four.ts. The index.ts file is going to be the main entrypoint file for our library. Its only purpose is to export out any code that we want to expose publicly in our library. The connect-four.ts file is going to be the main class for our library. This file is currently setup to export out a class called ConnectFour, and the index.ts file imports this class and exports the class as part of the library.
Currently, the ConnectFour class contains no source code and just a few high level comments on some of the requirements that will be needed for our library. Before we start writing our class, lets review some of the functionality that we will need.
To represent the game board of Connect Four, we can use a two dimensional array that will have the dimensions of 7 x 6. If you are not familiar with a two dimensional array, a 2D array is simply an array that contains another array. For example:
const arr = [
  [1,2,3]
];
When we create this 2D array, we will initialize the inner arrays with 0, which will represent an empty cell. To represent the players game pieces, we can use the values 1 and 2 to represent each player.
To play the game of Connect Four, players can do one of two things: either drop a game token into an empty column, or they can start a new game by removing all of the game tokens from the board. To represent these two actions, we will add two methods to our ConnectFour class: makeMove and resetGame.
Finally, for our game state we will need to keep track of a few different things and expose these values as properties on our class:
- the board state - needed so we can render out the current board and where the players game pieces are currently placed
- the current players turn - needed so we can render out which player should make the next move
- indicator if a player won the game
- indicator if a game is over - needed in case the game ends in a draw and there is no winner
Now that we have planned the initial requirements for our ConnectFour class, we can start writing some code!
Class Constructor and Private Properties
To get started, the first thing we will do is add the properties we discussed above to our ConnectFour class. To do this, replace the code in the connect-four.ts file with the following:
/* Represents the two player identifiers for the Connect Four game. */
export enum Player {
  ONE = 'ONE',
  TWO = 'TWO',
}

/* Represents the possible values of a cell in the Connect Four board. */
export type CellRange =
  | 0 // empty cell
  | 1 // player one game piece
  | 2; // player two game piece

/**
 * Represents the game of Connect Four, where players attempt to get four checkers in a row -
 * horizontally, vertically, or diagonally. The first player to do so wins.
 */
export default class ConnectFour {
  /* an internal representation of the Connect Four Board */
  #board: CellRange[][] = [];
  /* used for tracking for which player will place the next game piece */
  #playersTurn: Player = Player.ONE;
  /* used for tracking for if the game is over, either from the board being filled or a player getting a Connect Four */
  #isGameOver = false;
  /* used for tracking if a player wins the game */
  #gameWinner: undefined | Player;

  constructor() {}
}
In the code above we did the following:
- Created a new
enumcalledPlayerto represent the two players in our game. Thisenumwill be used throughout theConnectFourclass. - Created a new
typecalledCellRangeto represent the possible values a cell in our Connect Four board can have. - Created four new
private
fields on the
ConnectFourclass. As of ES2022, you can now create private fields on a class in JavaScript by prefixing the field with the#sign. By doing this, JavaScript will ensure these properties are only accessible internally to the class the fields were added to.
Since the properties we are added are private, we will need a way to expose those values to anyone that is using this class. We can do this by creating a getter for these fields. In JavaScript, a getter is when you use the get keyword to bind an object property to a function that will be called when that property is looked up. As an example:
get playersTurn(): Player {
  return this.#playersTurn;
}
If we reference the .playersTurn property, this will call a function that just returns the value of our private field #playersTurn. To create a getter for each of our private fields, we will need to add the following code to the ConnectFour class below the constructor:
get board(): CellRange[][] {
  return JSON.parse(JSON.stringify(this.#board)) as CellRange[][];
}

get playersTurn(): Player {
  return this.#playersTurn;
}

get isGameOver(): boolean {
  return this.#isGameOver;
}

get gameWinner(): undefined | Player {
  return this.#gameWinner;
}
For most part, all of our getters are just returning the value for the private property that is being referenced. However, in the board getter we are first stringifying the array and then parsing that string to return an array. We are doing this because in JavaScript, an Array is a
reference
data type, when means if we just return the #board, the values in the #board array can be modified outside the ConnectFour class instance.
Initial Class Methods
With the getters setup for our class, we will next add the initial methods for our ConnectFour class. To do this, add the following code below the getters in the connect-four.ts file:
/**
 * Allows player to reset the game state, and start a brand new game.
 */
public resetGame(): void {
  // TODO
}

/**
 * Allows the current player to make a move by providing the column they would like to drop their game piece into.
 */
public makeMove(col: number): void {
  // TODO
}
In the code above, we added two public methods to our class: makeMove and resetGame. The makeMove method will expect the column that the player wants to to drop their game piece into, and the resetGame will take no arguments. For the time being, these two methods will have no code and we will leave a TODO comment in each method.
Wrap Up
In this article, we reviewed the rules and game play of the game Connect Four and we started to build out the initial ConnectFour class by adding the properties and methods that will be needed.
You can find the completed source code for this article here on GitHub: Blog Post 1 Code .
If you run into any issues, please reach out via GitHub Discussions , or leave a comment down below.
In part 2 of this series, we will start to add the game logic for when the game is initialized, add the ability to reset the game state, and look at how we can test our code.
